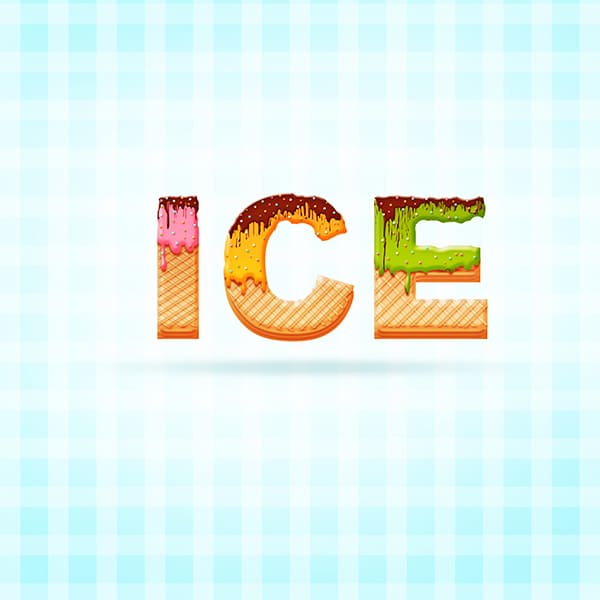
Create an Ice Cream Text Effect in Photoshop
Today I will show you how to create an awesome ice cream text effect! The process is simple enough for any level Photoshop lover. We will use the basic tools and effects along to achieve the final outcome in short time. So let’s begin!
Tutorial Details
Program: Adobe Photoshop CS6
Estimated Completion Time: 45 minutes
Difficulty: Beginner-Intermediate
Step 1
Open a new file (File > New) in Adobe Photoshop with the following settings.

Step 2
Fill background with the color #aff8fd.

Step 3
Using soft brush with white color #ffffff and draw a dot light in the center of background, then lower Opacity = 72% .

Step 4
Pick the Rectangle tool and set the values like this

Step 5
And you’ll get a vertical stripe. Fill it with white color #ffffff. Then we duplicate (Cmd + J) the stripe and place them as this image below.

Step 6
We place all of vertical stripes to a new folder. I named this folder as ” vertical stripe ” then lower Opacity = 40%

Step 7
Duplicate the (Cmd + J) the ” vertical stripe ” older , then we rename it as ” horizontal stripe “, and rotate this folder to 90 degree then we set lower Opacity = 30%

Step 8
We’re done with the background. Now we use Arial Black font and create this text. Right – click and rasterize the text. Place this text to a new folder and name it as ” Cone ” . Place a copy of the text shape off to the side of the artboard, which we will use later.

Step 9
Double – click on text layer, from menu choose Blending mode . Add ” Bevel & Emboss “.

Add ” Inner Shadow ”

Add ” Inner Glow ”

Add ” Inner Glow ”

And we got result like this

Step 10
Add layer mask for the ICE text, then we use hard brush to erase some parts like this image below.

Step 11
Duplicate the (Cmd + J) the ICE text, place the ICE copy under and move it down a little bit, keep the layer style as the way it is, but the ” Gradient Overlay “.

And we got result like this.

Duplicate the (Cmd + J) the ICE copy text, place the ICE copy under and move it down a little bit.

Step 12
Next, we will create stripes for the cone biscuit. Grab the Rectangle Tool and draw some lines like this image below.

Step 13
Collect all of the stripe layers into a single group. Merge all of the shapes together. You can do this by selecting the groups by holding the Shift key, then right-click to open the options window and choose Merge layers. Now the shapes turn into image. Double-click on this layer and from menu choose Blending mode . Add ” Bevel & Emboss “.

Add “Inner Shadow ”

Add ” Inner Glow ”
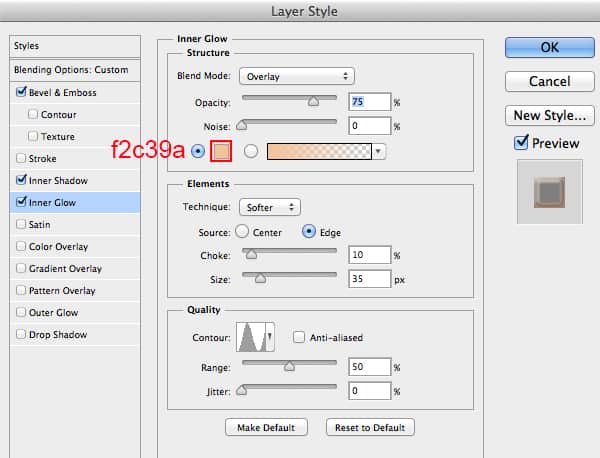
Add ” Gradient Overlay ”

Add ” Drop Shadow ”

Then we lower Opacity = 70% and we got a result like this.

Step 14
Now we add layer mask and use hard brush to erase some parts like this image below.

Step 15
Duplicate this group, and go to Edit > Transform > Flip horizontal and we got a result like this.

Step 16
Repeat the previous steps for the rest of the text. And you should get result like this.

Step 17
Now we will create ice cream. Back in Step 8, I mentioned placing a copy of the text shape outside the Artboard. Go ahead and grab a copy to work with. Place the text shape as shown in the image below.

Step 18
In this step, we will create pink ice cream for the text shape ” I “. Double-click on this layer and from menu choose Blending mode . Add ” Bevel & Emboss “.
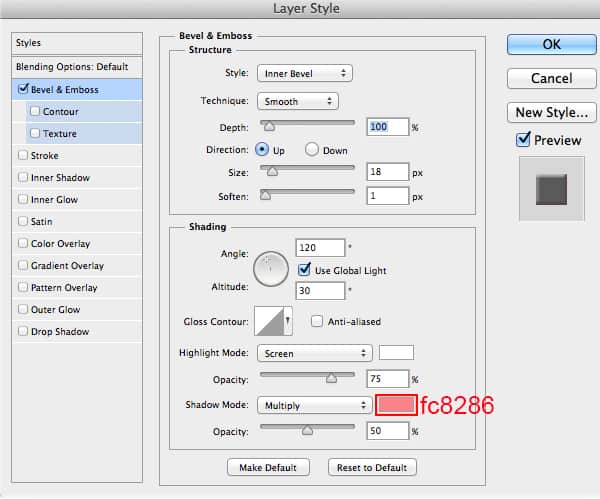

Add ” Inner Shadow “.

Add ” Gradient Overlay “.

And we will get a result like this.

Step 19
As you know , the ice cream is never perfect. Now we add layer mask on this layer and use hard brush to erase some outside part of the ice cream.

Step 20
Duplicate the ice cream part that we had created. In this step, we will create yellow ice cream for the text shape ” C ” . You should delete the layer mask for the text shape copy. Double-click on this layer and change the setting.


We change ” Inner Shadow ” setting.

We change ” Gradient Overlay ” setting.
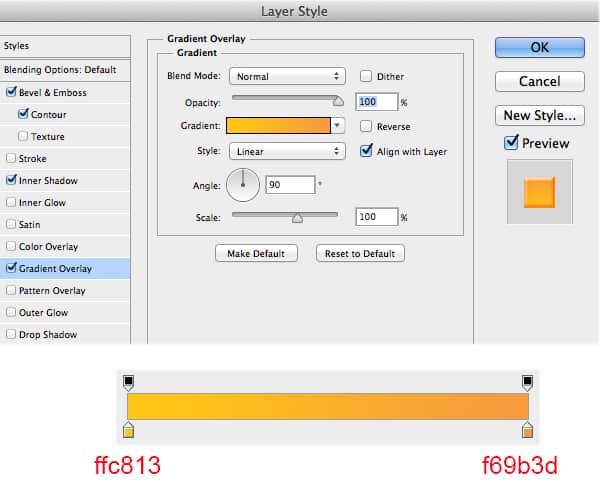
And you should get result like this.

Step 21
Now we add layer mask on this layer and use hard brush to erase some outside part of the ice cream.

Step 22
Repeat the previous step to create green ice cream for the text shape ” E “. Double-click on this layer and change the setting.


We change ” Inner Shadow ” setting.

We change ” Gradient Overlay ” setting.

And you should get result like this.

Step 23
Now we add layer mask on this layer and use hard brush to erase some outside part of the ice cream.

Step 24
Create a new layer and place it below, now we add shadow for the ice cream. We use soft brush with color #a25229 and draw the shadow then lower Opacity = 81%. You can use the layer mask to erase unwanted shadow area.

Step 25
Now, we will create chocolate syrup over the ice cream. First, we grab a copy of ICE text shape and place it on top of layers. Double – click on text layer, from menu choose Blending mode . Add ” Bevel & Emboss “.


Add ” Inner Shadow “.

Add ” Gradient Overlay “.

Here is my outcome.

Step 26
Next, we add layer mask on chocolate layer and use hard brush and erase some parts to get the proper imperfections for ice cream. I used large hard brush to erase most of the chocolate parts, and small hard brush to create the chocolate drops.

Step 27
For additional toppings, we will create sprinkles over the chocolate. We use small hard brush to create some circle like this image.

Step 28
Double-click on this white sprinkles layer and use the settings below.


And you should get result like this.

Step 29
Create a new layer and add more small brush. Repeat the previous step for blue sprinkles.


Step 30
Repeat the previous step for pink sprinkles.


And you should get result like this.

Step 31
Here is my outcome for yellow sprinkles.


Step 32
Repeat the previous step for green sprinkles.


Here is my outcome.

Step 33
And we’re done with the sprinkles. In this step, we will create shadow for ICE text shape. Use the soft brush with color #77a6a9, then draw a shadow like this image below, then lower Opacity = 40%.

Step 34
Click on the appropriate icon to ” Create new fill or adjustment layer ” found at the bottom of the layers panel, and select ” Curves “. Use these settings to adjust the tone.

Then we use soft brush to erase some parts like this image below.

Step 35
Click on the appropriate icon to ” Create new fill or adjustment layer ” found at the bottom of the layers panel, and select ” Brightness/Contrast “.

Then we use soft brush to erase some parts like this image below.

Final Results


No comments:
Post a Comment
silahkan kritik dan saran dengan bahasa yang baik dan benar